Back to all Blogs

Generating images and videos

Let's begin using text to create images, art, and videos together!

Gencraft
3 minutes read

Features

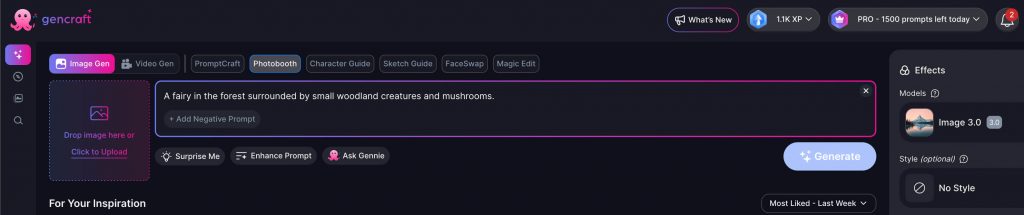
To get started, open Gencraft at https://gencraft.com or on the iOS/Android app. At the top of the generate page, you can choose whether or not you would like to create an image or a video.

Step 1: Enter Your Prompt

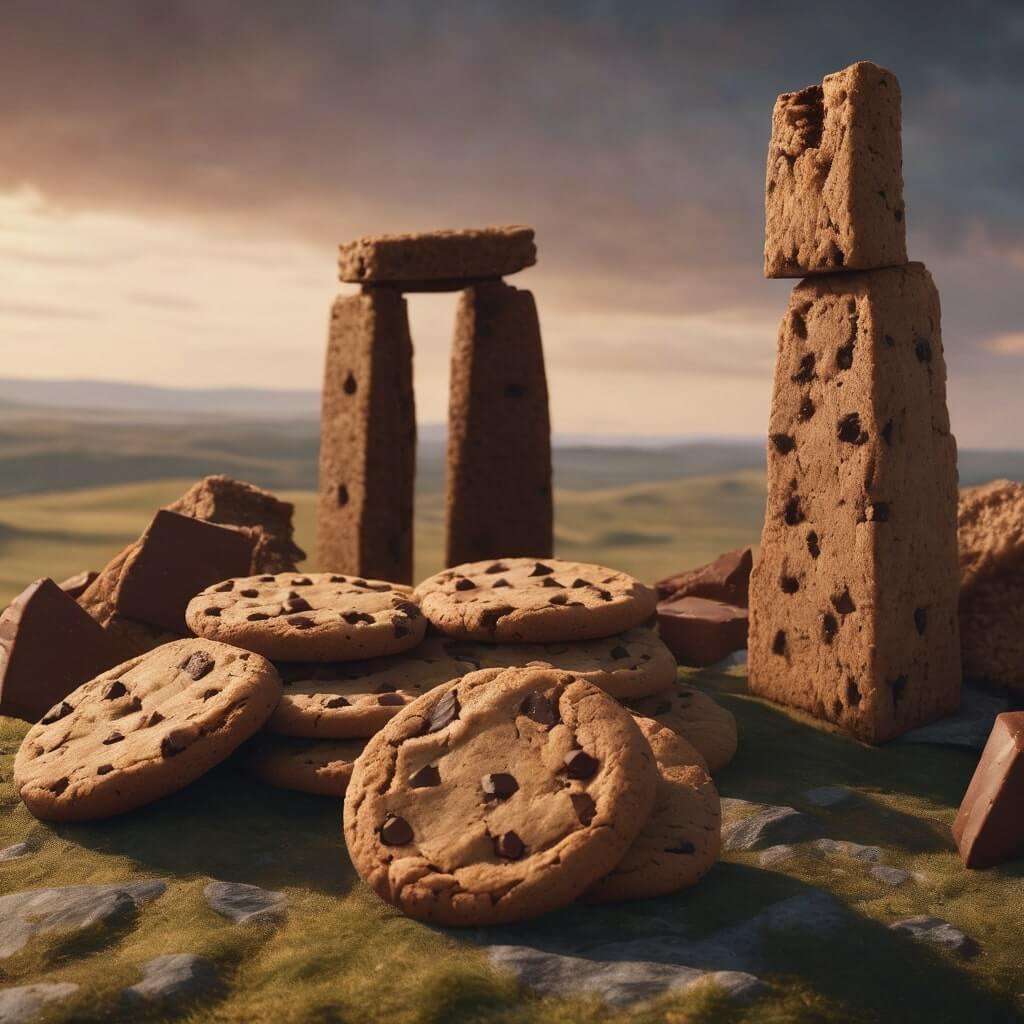
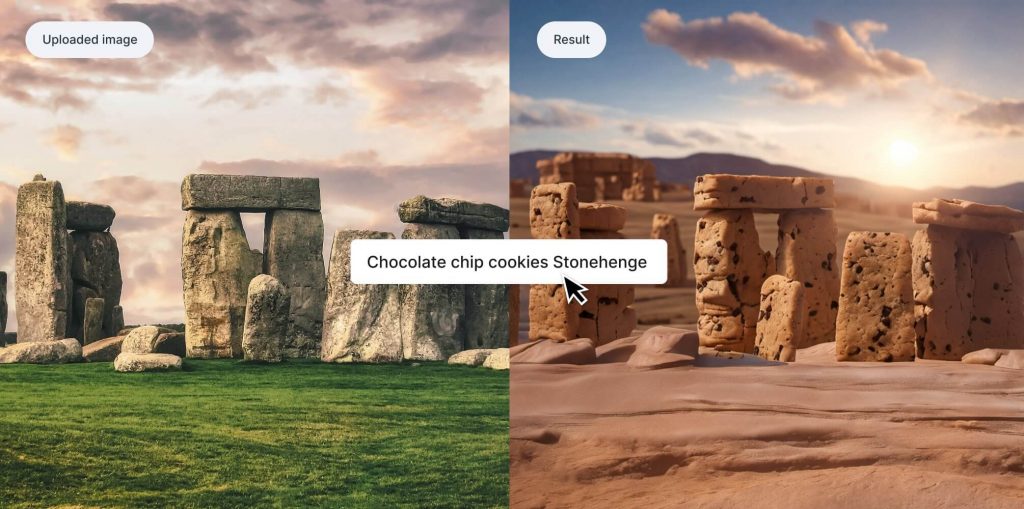
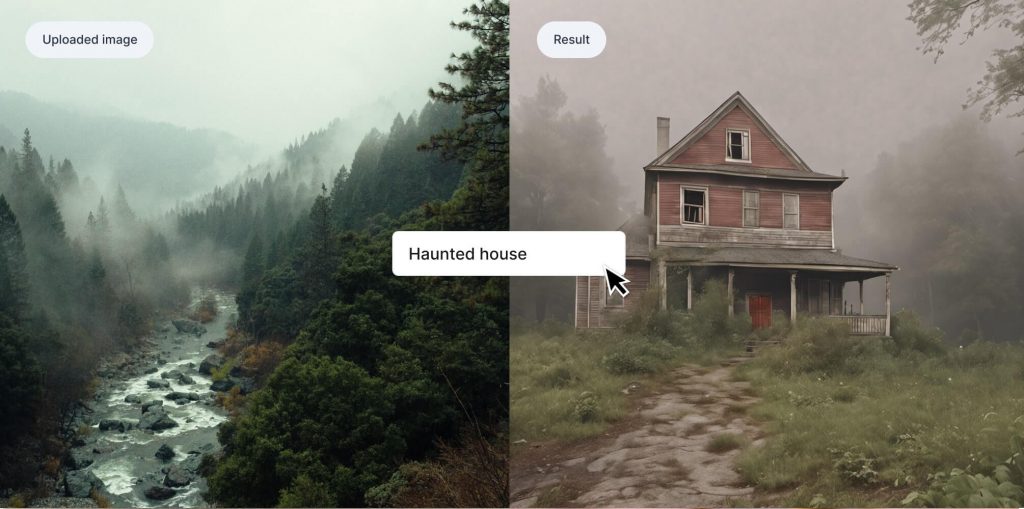
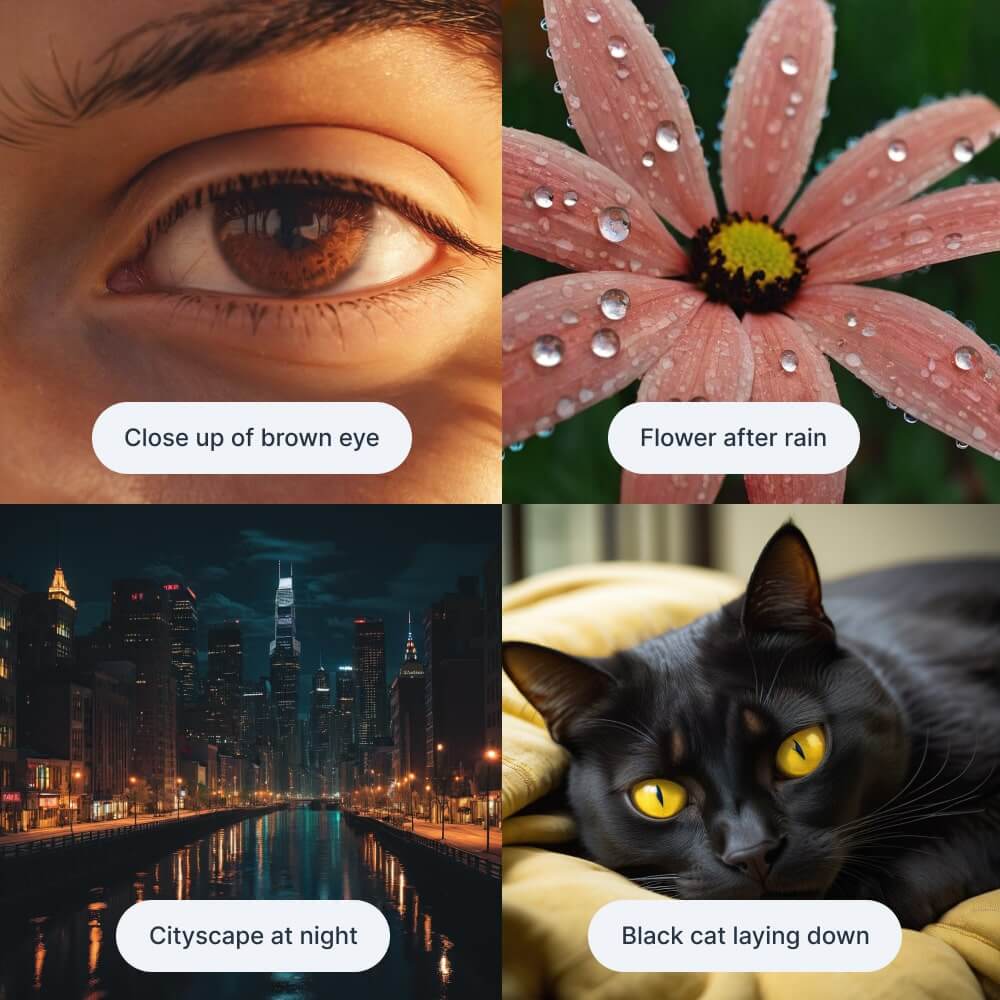
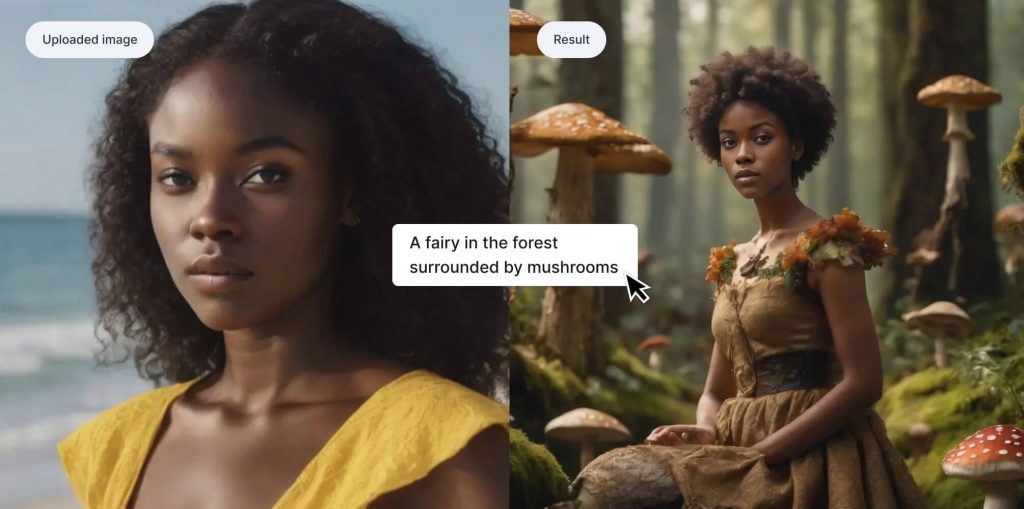
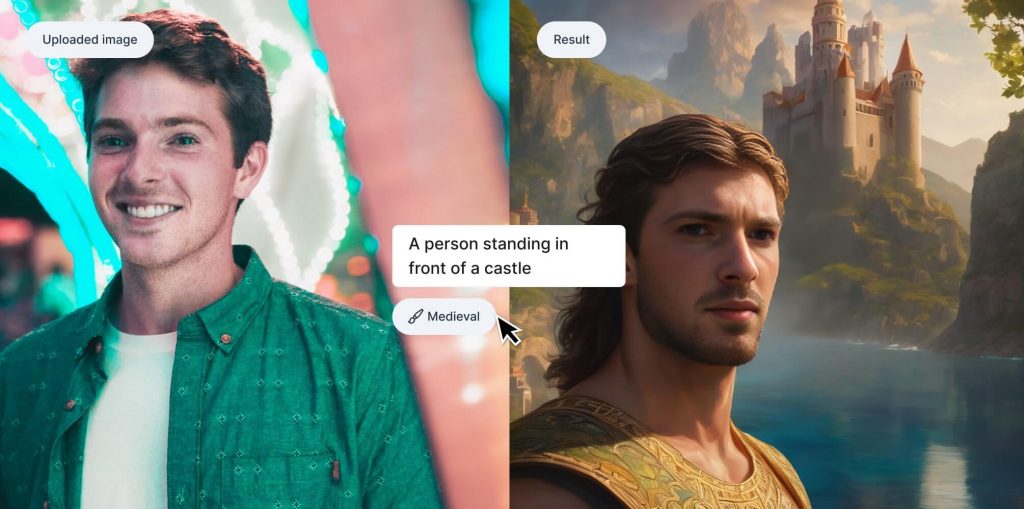
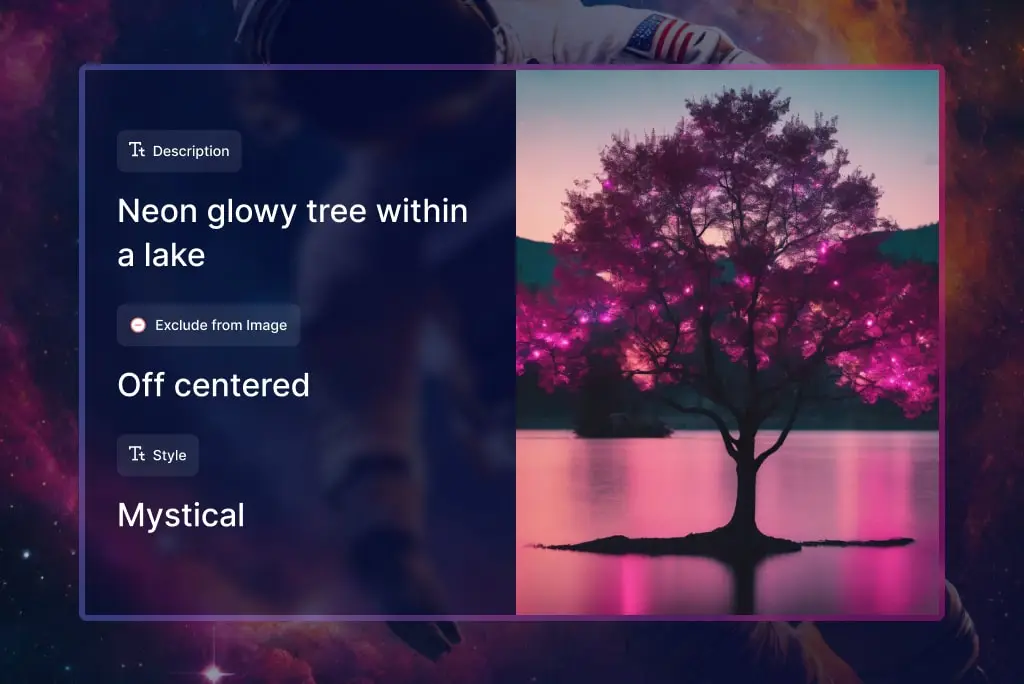
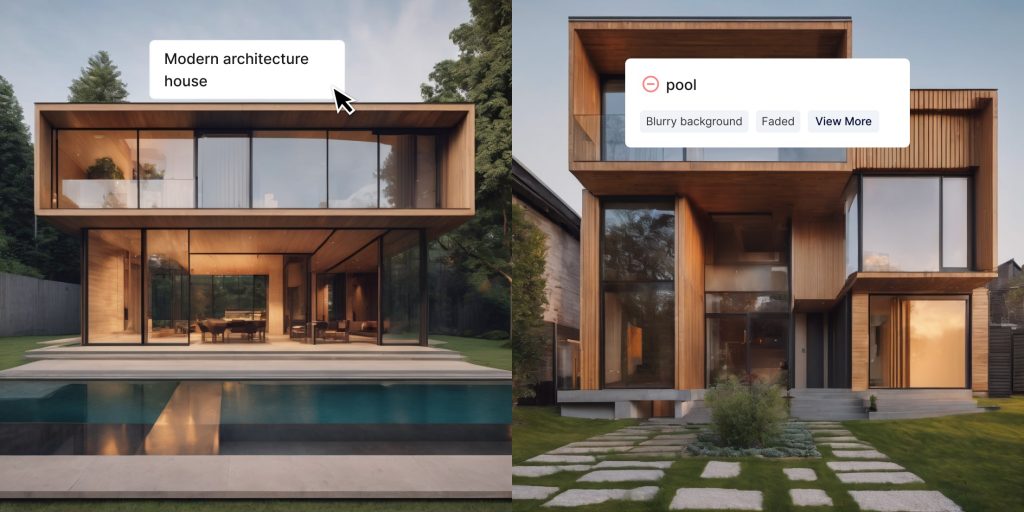
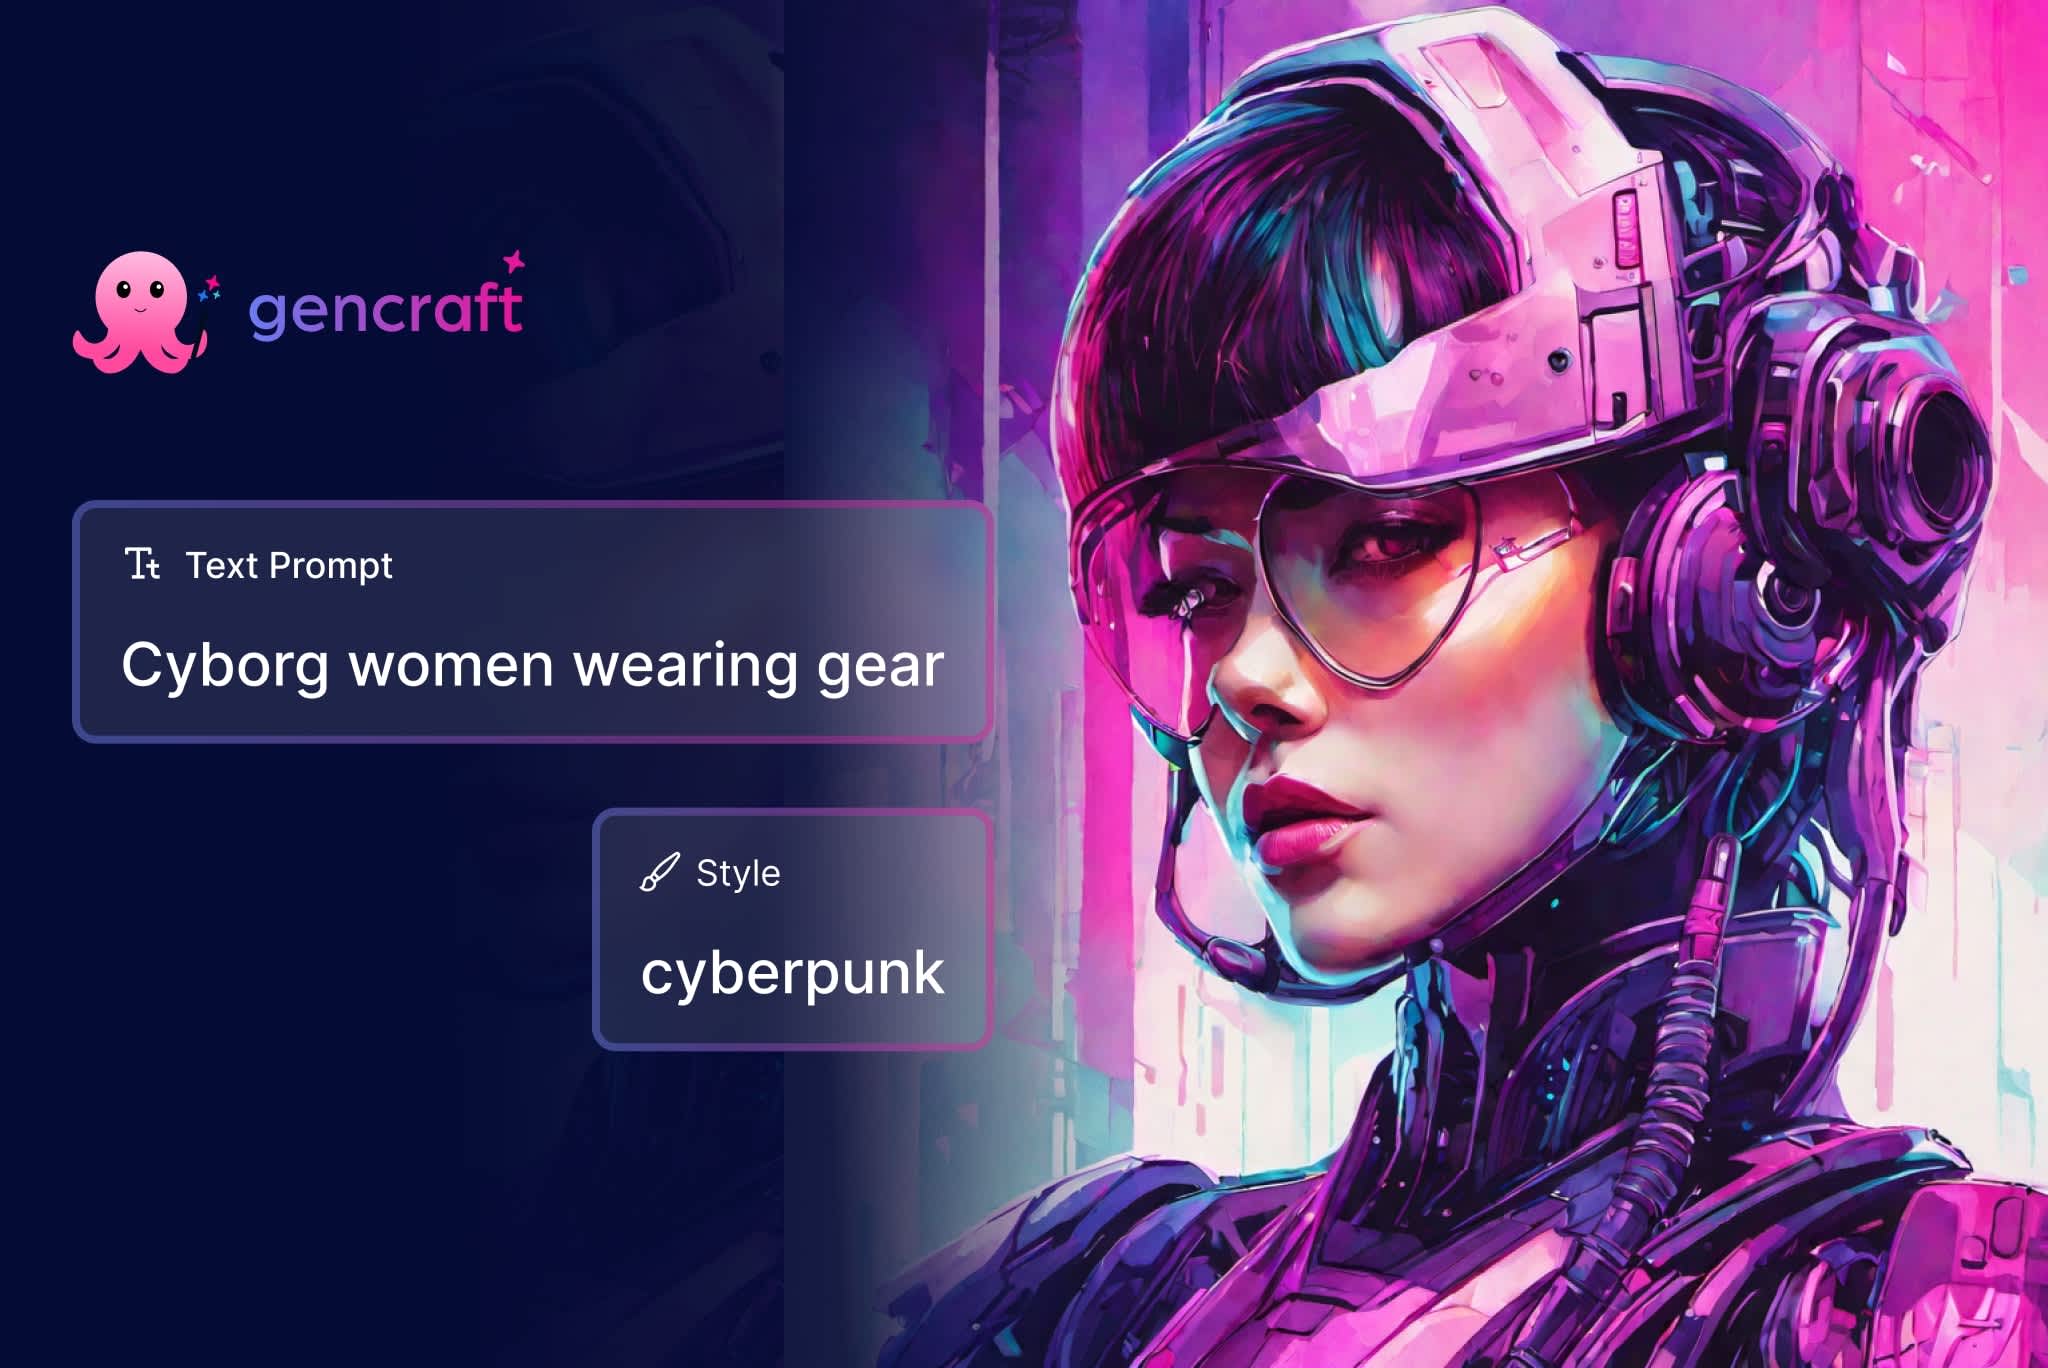
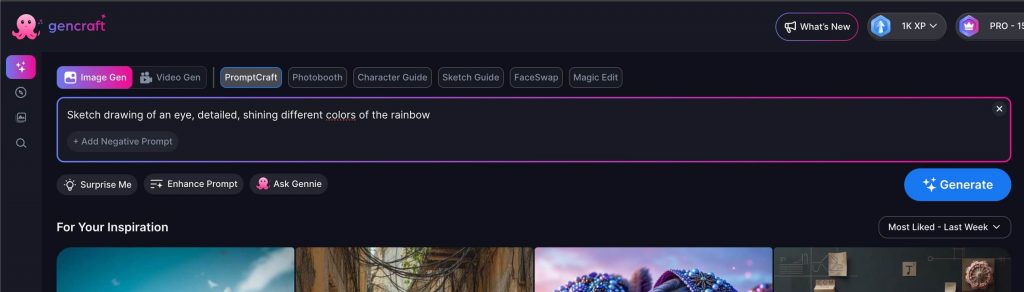
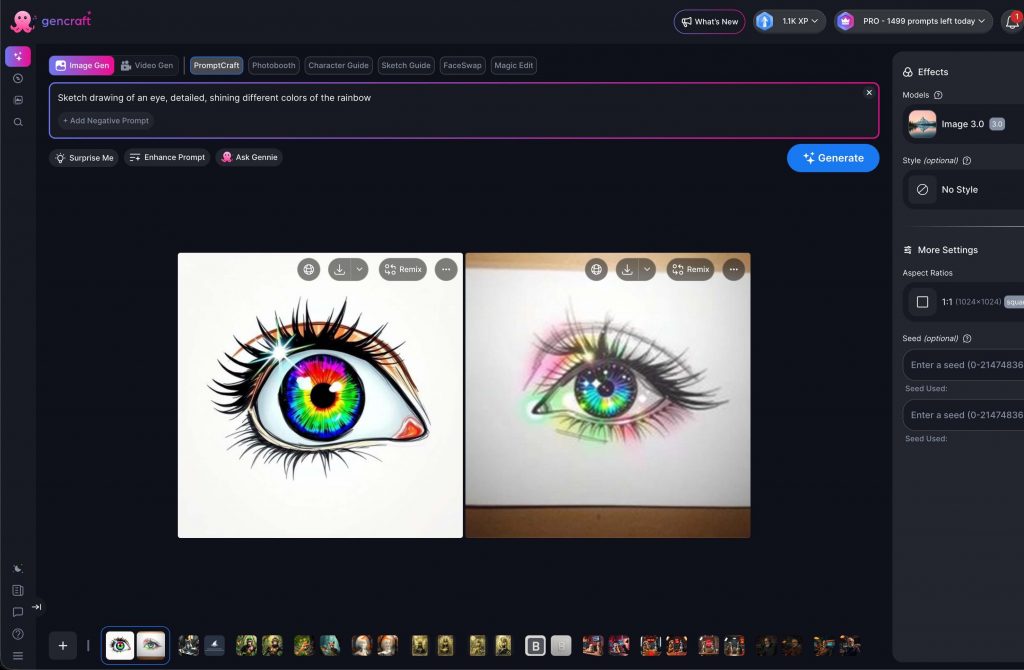
Enter a prompt that you would like to see become generated into two unique images or one 2-second video. It can be as short or as long as you like, though the more specific you can get the more the result will align with what you’re envisioning.

If you don’t have a specific prompt in mind, you can click “surprise me” to see a random prompt. You can use this prompt as-is, or you can use it as a starting point and edit it as much as you want before generating.

If you want help coming up with a prompt, you can use our Enhance Prompt feature to turn your prompt into something longer and more detailed. You can also add emphasis to certain words or phrases in your prompt by using parenthesis. For more information on both of these features and tips for prompt writing, see our prompt guide here.

The prompt box on Gencraft’s “Generate” page.

Step 2: Select a Style

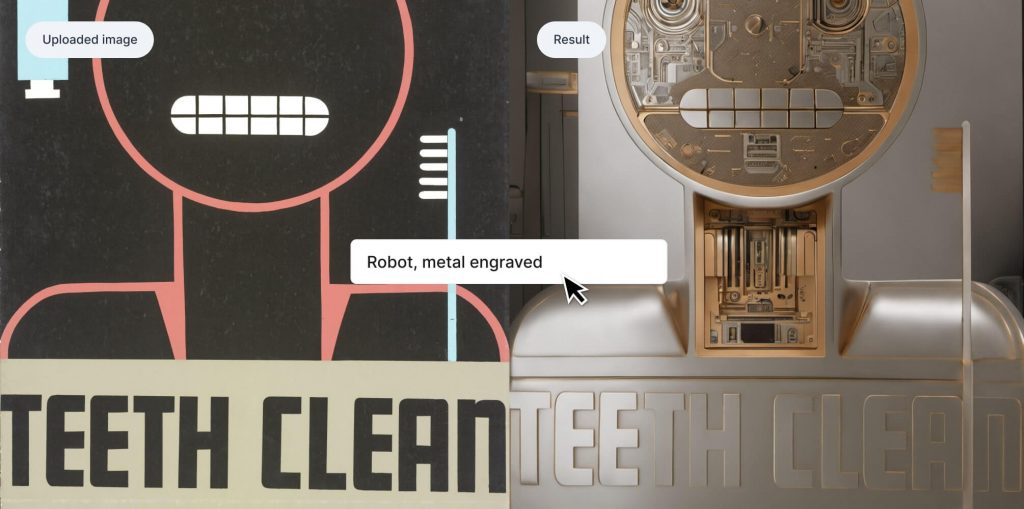
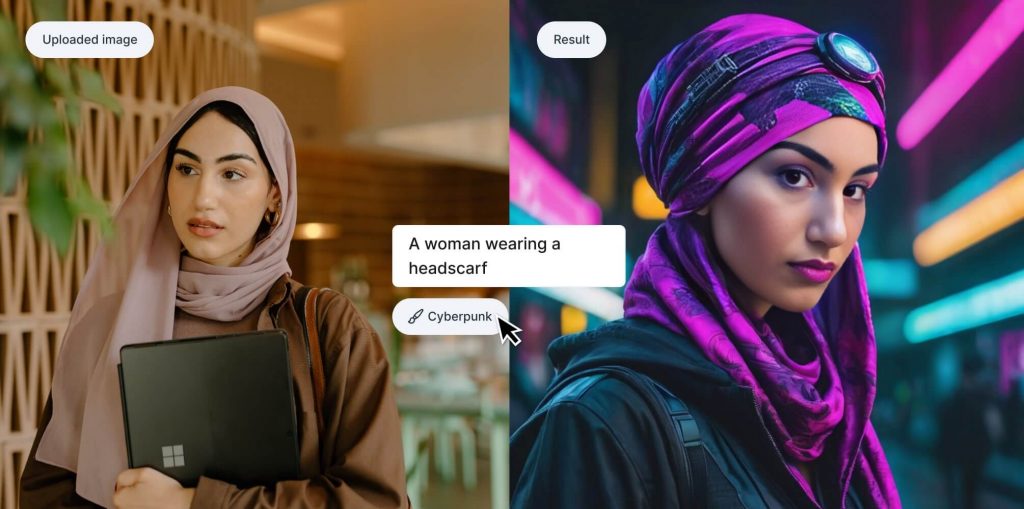
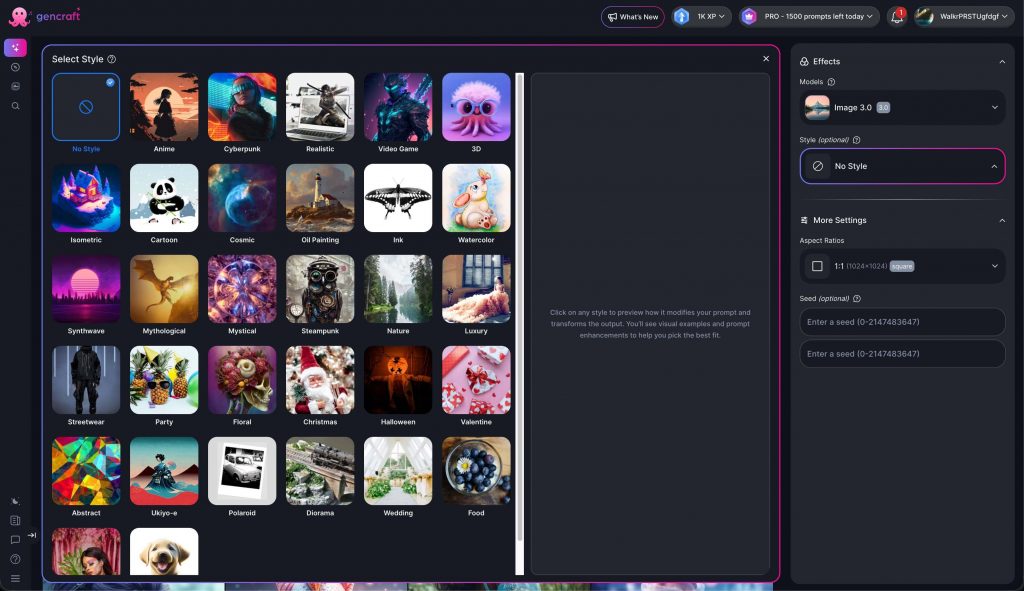
Before submitting your prompt, you can choose to apply an image style to your creation. This is an optional step, but offers a useful alternative to including an “in the style of [STYLE]” section within your text prompt.

If you do choose to use a style, we have 31 styles to select from. To see all available styles, click anywhere on the “No style” section.

All 31 styles are shown on the left.

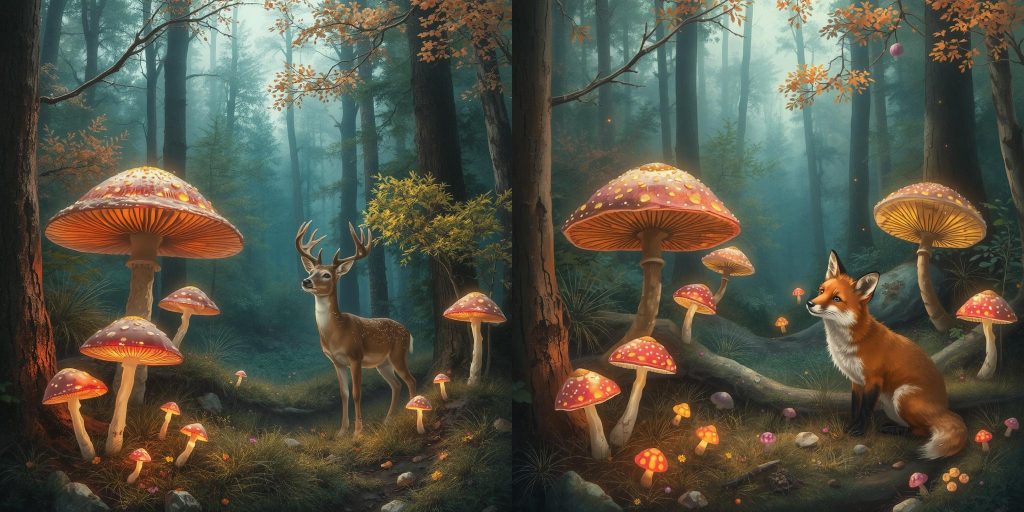
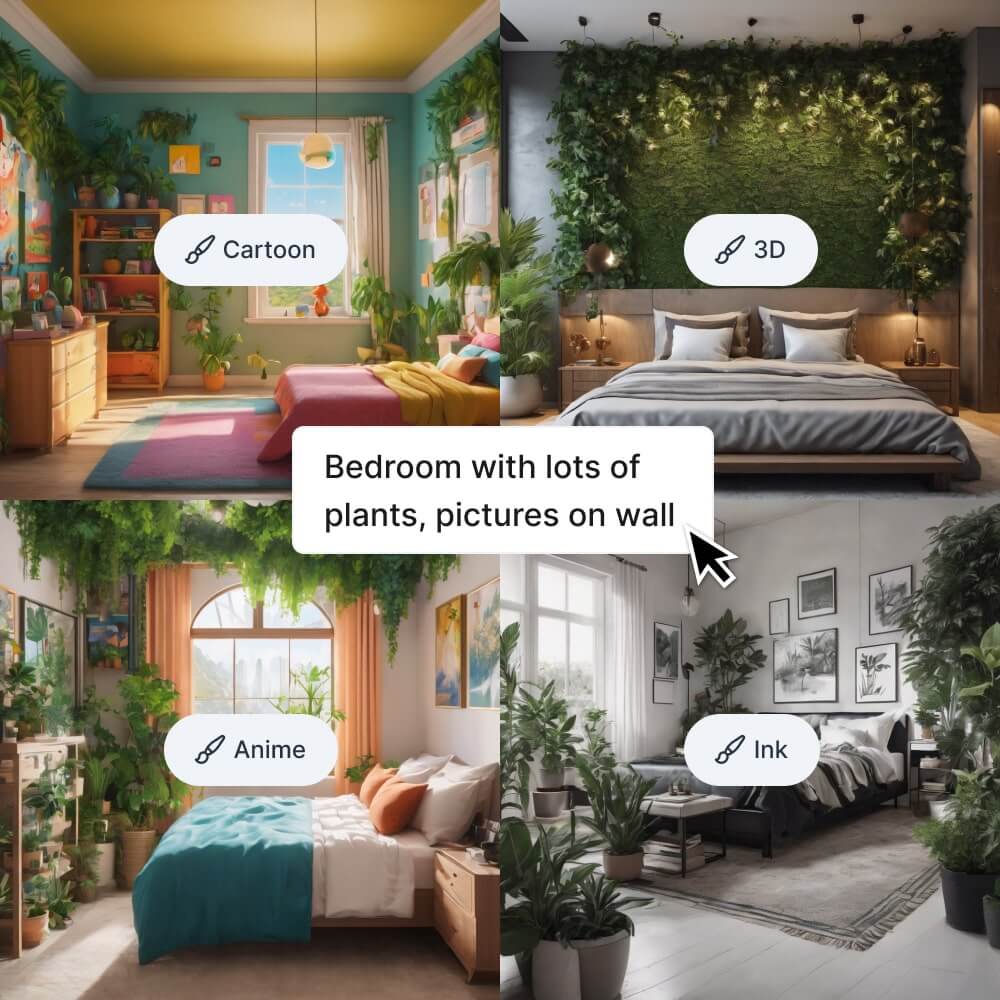
To show how styles influence your end result, here is the same prompt shown in four different styles: Cartoon, 3D, Anime, and Ink.

The same prompt shown in each style.

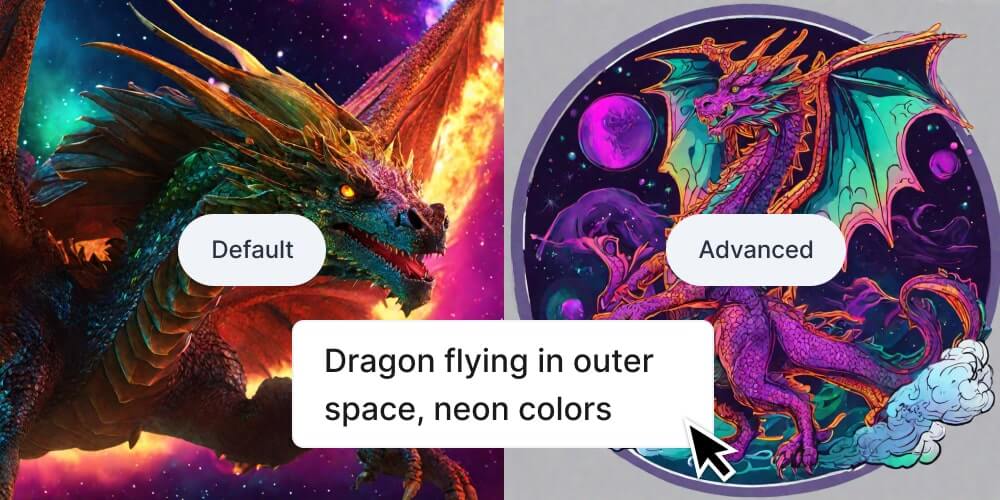
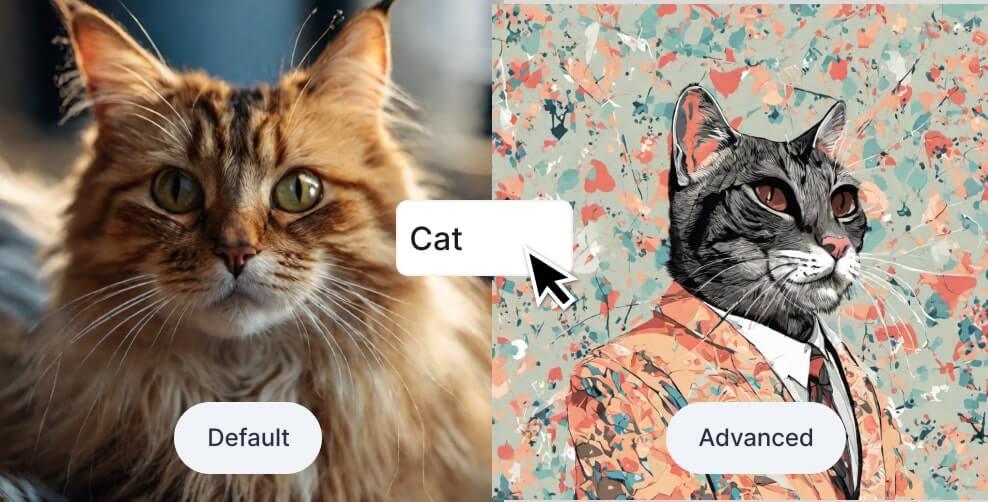
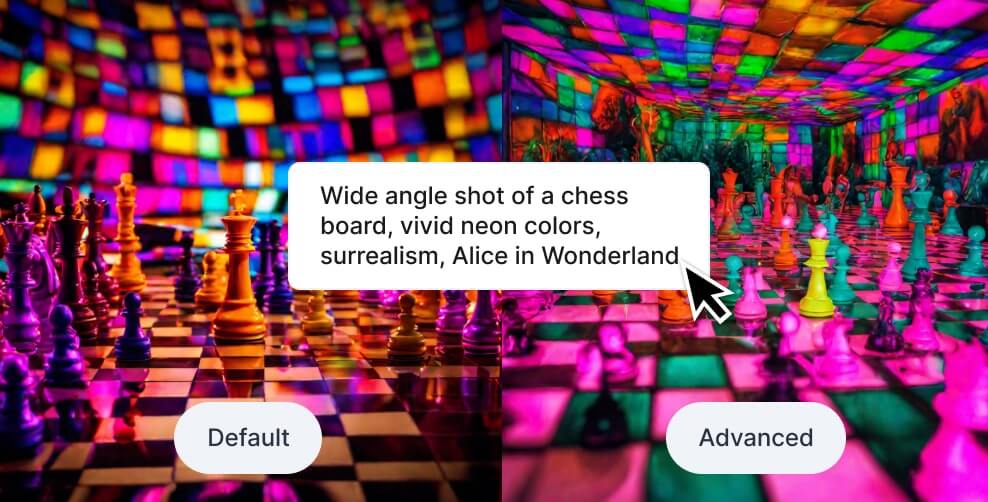
We also offer users the choice between two different models to use when creating your generators. The first, our Default model, is good for just about anything. It generates impressive results even with prompts that are only a few words long. More experienced users can also play around with our Advanced model. To read more about each of these models and how to decide which to use, see our guide to choosing a model.

Step 4: Enter a Negative Prompt (Advanced)

You’ve described what you want to see in your result, but what about what you don’t want in your result? This optional step allows you to get even more specific about what you want your final creation to look like by specifying anything that you want to exclude from your image. Read more about negative prompts here.

Step 5: Generate!

Hit the “Generate” button on the bottom right of your Prompt Input box. You’ll probably have to wait a bit, during which time we’ll display a few prompts from other creators for some inspiration.

When your creation is ready, it will appear below the Form. You will get two different images for each prompt submission and can click to view the expanded view of that image. 

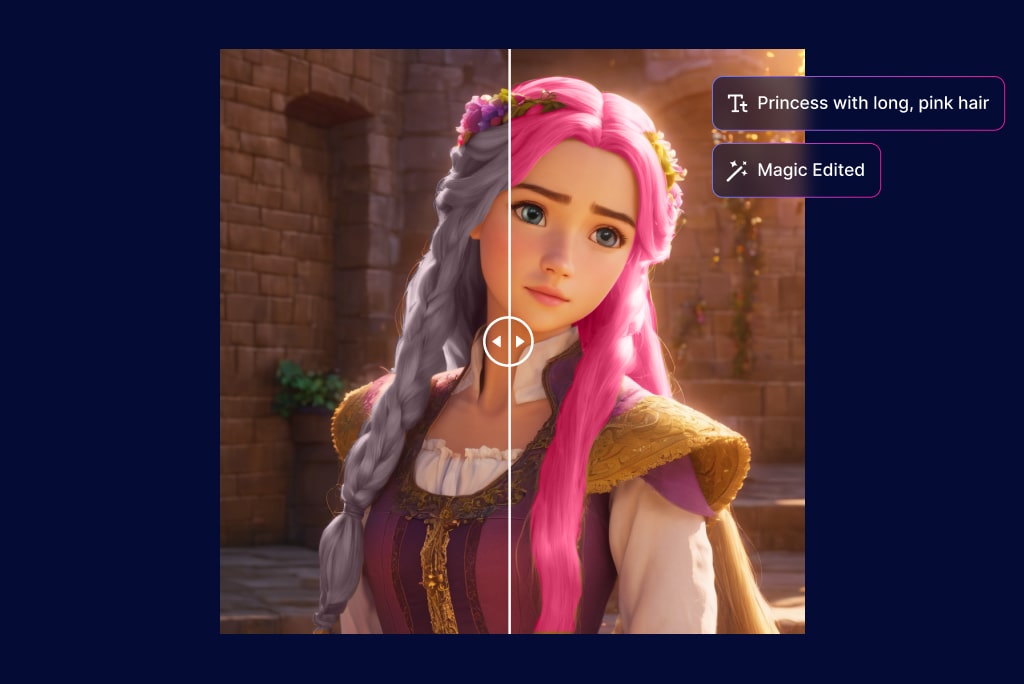
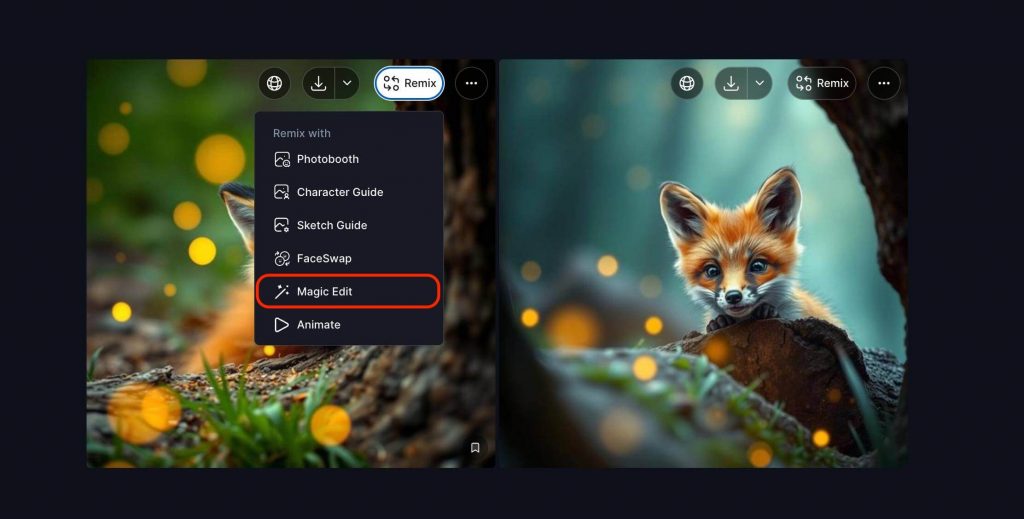
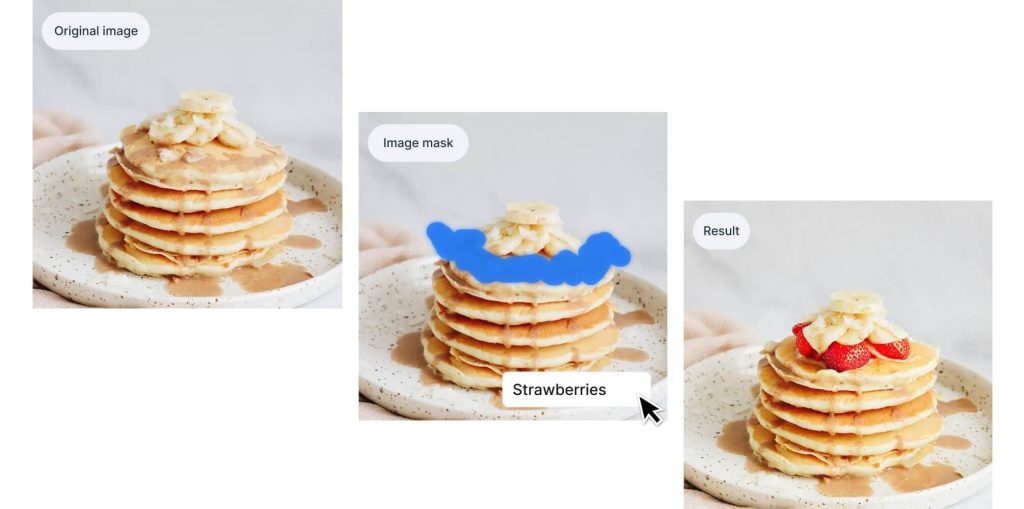
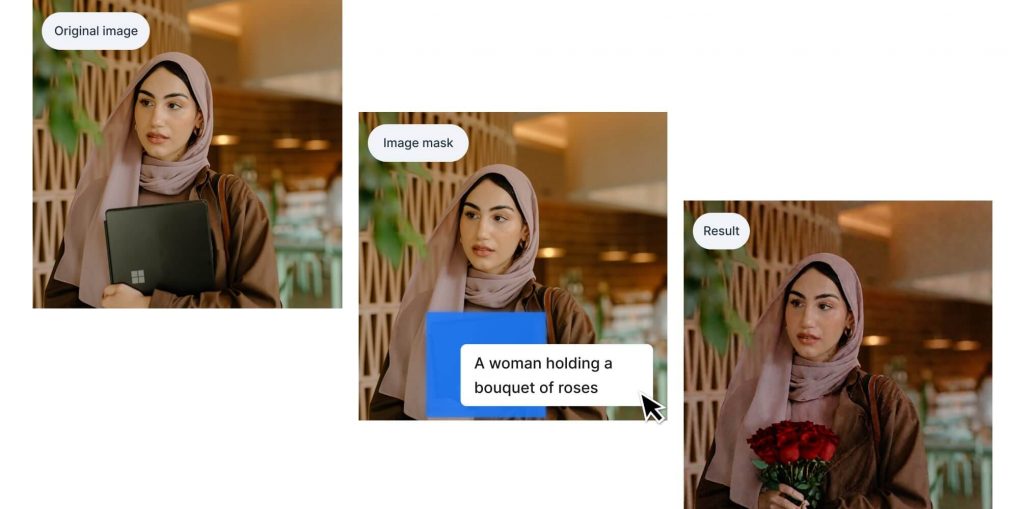
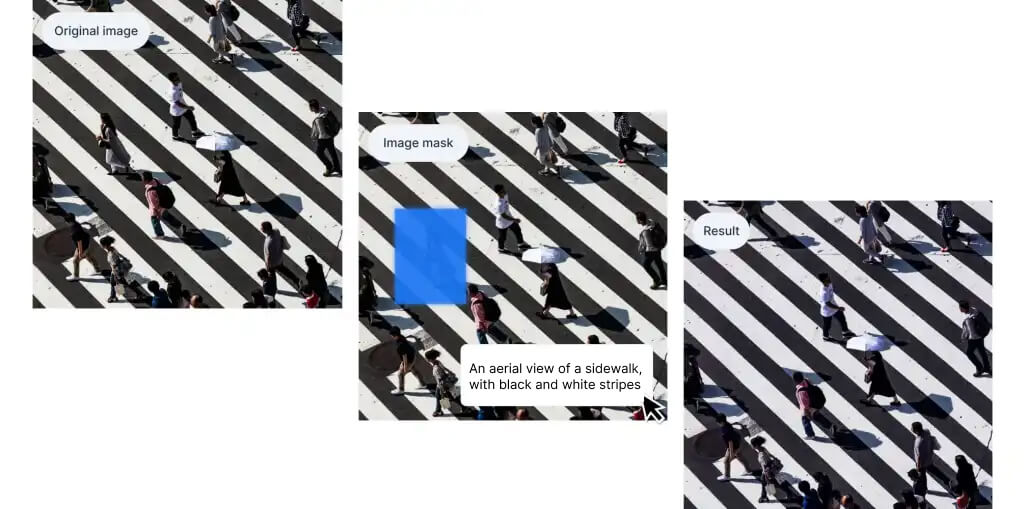
If there are changes you want to make to your creation, you can use our Magic Edit feature to regenerate certain subsections of the image. Learn more about this process in our guide to Magic Edit.

Go to the bottom right “Download HD” button to download your creations in HD (1024 x 1024). If you’re a premium subscription user, you can also download your images in 4k (4096 x 4096).

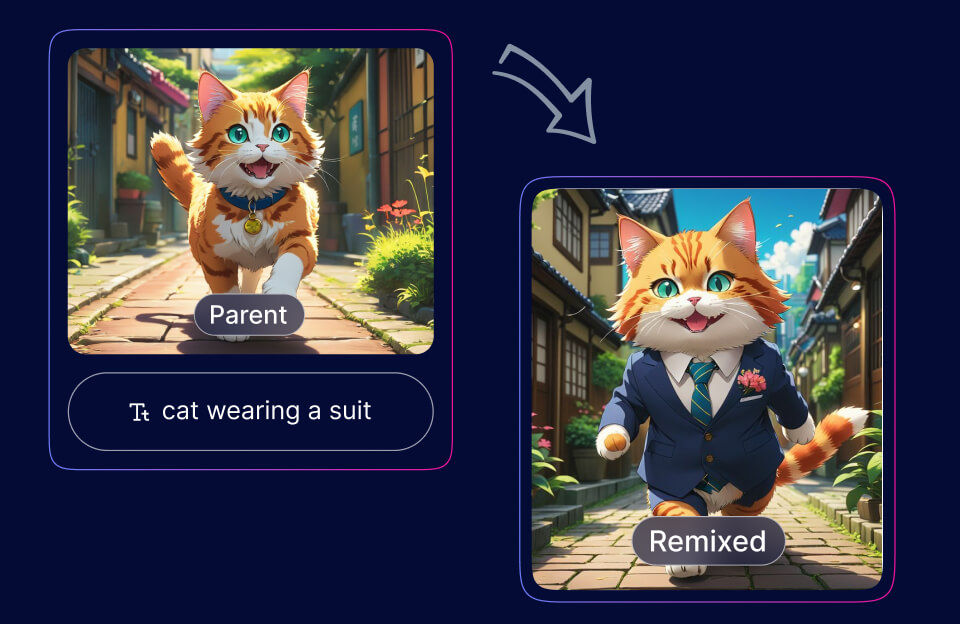
You can also take advantage of Gencraft’s social features and publish your creations to your user profile for the world to see.

That brings us to the end of our tutorial! We hope this helped you to get started exploring Gencraft and its endless creative possibilities. Check out our other step-by-step guides, and feel free to contact us at support@gencraft.com. if you have any questions we didn’t answer.

Join our Discord to share your art and meet other creators. https://discord.com/invite/gencraft

Back to all Blogs

Master Your Edits with Magic Edit

Edit your existing generations or your own images to perfection. Try Magic Edit to get the ideal result you're aiming for.

Gencraft
5 minutes read

Features

Use Magic Edit to make precise changes to any image without having to start over. With Magic Edit, you can adjust entire sections of your creations by applying new, detailed prompts – while keeping the rest of your image intact.

It’s fun, and highly flexible – whether you want to add, replace, or remove elements in an image – but you’ll need to learn how to prompt it correctly. Welcome to our step-by-step guide!

What is Magic Edit? 🎨

Magic Edit uses inpainting technology to that “paints over” sections of an image with a brand new image, according to your prompt. Our inpainting technology blends over the borders of your new image with the rest of the image, so that styles and subjects are retained. Whether you want to add strawberries to a pancake stack, swap a laptop for flowers, or remove distractions from a photo, Magic Edit is the right tool for you.

Step 1: Choose a photo to edit 📸

Start by picking a photo or creation you want to adjust. You have two options:

Find the image you want to tweak in My Creations OR My Uploads and click Magic Edit. When viewing My Creations, you can find the Magic Edit option in the Remix Option Dropdown.

Option to tweak with Magic edit.

Step 2: Draw a mask 🎭

Once you’ve selected your image, it’s time to tell Magic Edit which part to change. The mask you draw determines where the new prompt will be applied.

Here’s how to create a mask:

Auto-Segment your image if you prefer not to draw the mask manually. This feature automatically breaks your image into logical sections. Simply click on the sections you want to edit, and they’ll turn blue.

Manually draw the mask using either the box tool or pencil tool. As you draw, the selected area will turn blue to show what will be regenerated. If you make a mistake, click the Reset button at the top left to start over.

Gencraft Tip: If your Magic Edit generations aren’t coming out the way you want them, try enlarging your mask, so that it covers more area around the section that you want to change. When in doubt, be liberal with how large you draw your mask.

An image after being split into sections by the Auto-Segment tool.

Use Case: Insert objects👇

We have an image of a delicious stack of pancakes with bananas on top. But what if we want to add some strawberries to complete the look?

  1. Start Magic Editing your image of delicious pancakes.
  2. Draw the mask over the top of the stack (where the new strawberries will appear).
  3. Enter a detailed Magic Edit prompt: “A ring of strawberries on top of a stack of panckes, with bananas on top.”
    Gencraft Tip: The more detailed your Magic Edit prompt is, the better. Instead of simply writing “strawberries,” it’s better here to write “a ring of strawberries on top of a stack of panckes, with bananas on top.”
  4. Magic Edit will blend the strawberries seamlessly into the image!

Result: with just a few steps, you now have a picture-perfect stack of pancakes topped with bananas and strawberries! Hover over the image and drag the comparison bar to see the difference between the original and edited version.

The original image of pancakes, the mask, and the final image with strawberries added. Remember to be detailed in your prompt.

Use Case: Replace an object 🔁

In this example, let’s swap a laptop with a bouquet of roses for a more romantic vibe.

Magic Edit replaces the laptop perfectly, keeping the rest of the image untouched.

  1. Magic Edit your image of a woman holding a laptop.
  2. Draw the mask using the Box Tool over the laptop in her hand.
  3. Enter your new prompt: “A woman holding a bouquet of roses.”
The original image, the mask, and the final image of the woman holding roses. Remember to be detailed in your prompt.

Use Case: Remove an object 🗑️

To help you get the best results, here are two recommended approaches for removing elements or distractions from your images:


Approach 1: Small Object Removal

For smaller objects in your image, you can quickly remove them without detailed prompting.

  1. Select your image and choose Magic Edit.
  2. Mask the area where the small object is located (keep the mask relatively small).
  3. In the prompt box, type simple commands like “remove,” “erase,” or “delete.”

Magic Edit will handle the rest, blending the background naturally and seamlessly filling in the space where the object was.

Approach 2: Large Object Removal

For larger elements, providing a bit more context will ensure a smooth and accurate result.

  1. Select your image and choose Magic Edit.
  2. Mask the area with the large object you want to remove.
  3. In the prompt box, describe what you’d like to see in place of the object, such as, “An aerial view of a sidewalk, with black and white stripes.”

This extra description helps Magic Edit understand the background details you’d like to see, ensuring the large object is removed seamlessly while maintaining the integrity of your image.

The original image, the mask, and the final result.

Once your edit is complete, you can:

  • Compare your changes by dragging the vertical bar over the image to see the before-and-after.
  • Download your edited image or tweak it further with another Magic Edit!

Tips and Tricks for Best Results 💡

  • Keep your prompts consistent with the original prompt, and as detailed as possible. Specific instructions that are related to the original prompt like “Strawberries on a stack of pancakes with bananas on top” yield better results.
  • Combine masks with prompts. If you want multiple changes, you can mask several areas at once and describe each in your prompt.
  • Use larger masks to maximize your chances of blending elements smoothly.
  • Use Auto-Segment for precision. This feature is great for photos with complex elements where manual masking might take too long.

Explore limitless creativity with Magic Edit! Magic Edit opens the door to endless creative possibilities, whether you’re polishing up an old creation or bringing a new idea to life. Don’t hesitate to experiment and push the boundaries of what’s possible with your art!

Need help? Check out our other tutorials or contact us anytime at support@gencraft.com. We’re here to support your creative journey!

By the way – join our Discord to share your art and meet other creators 🥳https://discord.com/invite/gencraft

Back to all Blogs

Character Guide | Remix Tutorial

Character Guide allows you to generate variations of your photos, create consistent characters, and have greater control over your AI artwork.

Gencraft
2 minutes read

Features

Welcome to Gencraft AI’s newest feature, Character Guide! It allows you to generate variations of your photos, create consistent characters, and have greater control over your AI artwork. In this tutorial, we’ll walk you through how to use this powerful tool and showcase some examples of what you can achieve with it.

When to use Character Guide

Create Consistent Characters

Character Guide is perfect for creating consistent characters across different scenes and settings. Whether you’re developing a story or just having fun,Character Guide ensures your characters maintain their core features while adapting to new environments.

Generate Variations of Your Photos

With Character Guide, you can create multiple versions of your favorite photos. Whether you want to see yourself in different settings or explore various artistic styles, Character Guide makes it easy.

Take Control of Your AI Artwork

Character Guide gives you control over your AI-generated art. By adjusting settings and using detailed prompts, you can guide the creative process and achieve your desired results.

Step-by-Step Guide

  1. Start with selecting Character Guide: Choose the Character Guide feature from the menu of Gencraft options. ( either from the Generate Form tabs or from My Creations by clicking on Remix button )
  2. Choose an image: Click on the “Add Your Photo” button visible on left of the prompt window. Upload your photo or select an image from your past uploads.
  3. Add your “Character Guide” prompt: Type in your desired prompt. This could be a new scene, a specific style, or a creative subject you want to add. For example, “Wearing a hat on the beach.”
  4. Generate! Hit “Generate” and watch as Gencraft AI produces variations of your photo based on your prompt. Here’s an example

Conclusion

We hope this tutorial helps you get the most out of the Character Guide feature in Gencraft AI. Whether you’re looking to create variations of your photos, develop consistent characters, or take control of your AI artwork, Character Guide offers endless possibilities.

Feel free to explore and experiment with different prompts and settings. If you have any questions or need further assistance, don’t hesitate to contact us at support@gencraft.com.

Join our Discord to share your creations and connect with other artists: Gencraft Discord.

Back to all Blogs

Training Your Own Custom Models

Train your own model on Gencraft and unlock your creative potential!

Gencraft
3 minutes read

Models

Train your own model on Gencraft and unlock your creative potential! Create unique models by uploading images in a consistent style, and apply that style to your generations.

Note: This feature is available to Pro users only, and requires an additional payment per model training.

Say goodbye to pre-defined styles and let your unique vision take center stage with Gencraft’s Create Model feature. Want to generate images in a style that we don’t offer among our pre-built Styles or Models? Or maybe you want to generate images of a specific person that isn’t well-known enough to be recognized by the model? With this feature, you can build it yourself. Just upload a few photos, caption them, and then let us do the rest of the work.

Example Model

To get started, go to “My Library” on the top menu bar and select “My Models.” You’ll see a “Sample Model” that creates balloon animals. If you click on this model, you can view examples of uploaded images and their captions. You can also click “Use model” to try it out for yourself.

Four examples using a custom-made ballon model.

Step 1: Uploading Images

Select the “Create model” button to begin building your model. You’ll then be prompted to enter a name for your model. Next, you will upload the images that will be used to train your model. You can upload between 5 to 200 images, but we recommend at least 10 for optimal model quality.

Step 2: Captioning Image

After uploading your images, you will be prompted to enter captions for each of them. Make sure your captions are as long and detailed as possible for best results. These captions are crucial, as they are how your model will learn to replicate the styles and subjects in your images. It is also very important to be consistent in how you describe the style or subject of these images — for example if you’re uploading images of a person, call them by the same exact name in each of your captions.

A sample caption: “Kyle is a cartoon wearing jeans and a cowboy hat. Smiling, hands in his pockets”

Notice how detailed our caption is in the example above. The caption references “Kyle,” which trains the model to recognize this character and style. The more diverse the training images, the better the model will identify and reference Kyle in future creations.

We provide an “Instant Caption” feature as a starting point for your captions, but these captions are often short and don’t include much detail. We recommend editing them to include more descriptive language and specific names of objects and people.

An Instant Caption for an image of a rabbit made out of balloons: “Balloon sculpture of a grey rabbit.”

Step 3: Training Your Model

After you’ve captioned all of your images, you’re ready to start training your model! Model training requires a fee, and you will be prompted with a check out step before initiating training.

The model training process will take up to 30 minutes. After training is complete, you can find your model under the “My Models” section of your library. Simply click on it and then select “Use model” to begin generating with it.

That brings us to the end of our tutorial! We hope this helped you to get started exploring Gencraft and its endless creative possibilities. Check out our other step-by-step guides, and feel free to contact us at support@gencraft.com if you have any questions we didn’t answer.

Back to all Blogs

Control your AI images | Sketch Guide Tutorial

Upload a reference image to shape the output image's structure! Try Adding a Reference Image and gain more control over your results.

Gencraft
3 minutes read

Features

Upload a “Sketch Guide” and enter a prompt, and watch the two combine into a new image! The “Sketch Guide” feature brings your ideas closer to reality by echoing the original structure of your photo.

This feature works particularly well to specify image composition or particular shapes such as logos that you’d like to appear in your creation.

Note: This feature is not intended for adding reference images of faces. If you would like to incorporate a specific face or person into your generations, we recommend using our Photobooth feature.

To Generate, select the Sketch Guide option from the Generate form tabs. Post selection, you’ll see a prompt text input box and a “Click to Upload” section on the ride side of the Input. Populate your prompt and chosen image in their respective section and hit “Generate”.

Let’s take a look at four different examples to illustrate what adding a Sketch Guide can do.

Drawings and sketches

First, we’ll explore how this works with drawings. Uploading a drawing or sketch to Gencraft via the sketch guide feature is a great way to realize your creative vision and explore what future iterations of your artwork could look like. It can also be a great way to see your masterpieces in different artistic styles for example, a colored pencil drawing as a digital art piece — which can serve as further inspiration.

In the example below, we took a pencil sketch of a woman in a fancy coat and heels and added a neon color palette and cityscape background. Notice how the model has preserved all details from the original sketch, from pose to sunglasses.

Logos and shapes

First, we’ll explore how this works with logos and other shapes. This feature is a great option if you have a logo but want to change the style it appears in. Everything from its surroundings to the material it is made out of can change, but the general shape in the sketch guide will remain the basis of your image. Below, we made a simple wifi symbol a little more festive for the holiday season:

The Sketch Guide on the left turns an otherwise simple prompt into something more abstract and artistic.

Posters, banners, and text

This feature is also useful to transform posters, ads, and other images that mix shapes and logos with text. In the following example, we took a poster about maintaining good oral hygiene and gave it a more futuristic style.

Landscapes

Say you want to create an image of Stonehenge, but with all of the rocks made out of chocolate chip cookies. Using only a prompt and no Sketch Guide, this concept is not fully realized. We have some cookies, and several of them resemble Stonehenge. But some of them are also still in cookie form. Below is the result of the prompt “Stonehenge made out of chocolate chip cookies.”

The result of the prompt “Stonehenge made out of chocolate chip cookies”

Adding a Sketch Guide, however, allows us to use a real image of Stonehenge as the basis of our creation. This produces a much better result. Notice that the final image’s composition is nearly identical to the Sketch Guide’s composition.

Using a sketch guide to get a better depiction of Stonehenge

Using a landscape as a sketch guide also works to specify a certain image composition for images that are completely unrelated to your prompt. In the next example, the uploaded image is of a river running through a very foggy forest. When used with the prompt “Haunted house,” the resulting image has transformed the river into a path and maintains the same areas of the photo that are land and trees versus fog and sky.

The composition from the sketch guide is still noticeable in the result even with an entirely different subject

These are just several of the ways that a Sketch Guide can unlock new creative possibilities on Gencraft. As you experiment with the platform, you’re bound to find more ways in which this feature can enhance your generations.

Check out our other step-by-step guides, and feel free to contact us at support@gencraft.com if you have any questions we didn’t answer.

Join our Discord to share your art and meet other creators. https://discord.com/invite/gencraft


Back to all Blogs

Choosing the right model

Choose the best Gencraft model to generate precisely what you want.

Gencraft
4 minutes read

Models

Once you have your your prompt ready, choose the best Gencraft model to generate precisely what you want. We offer a wide range of models for different needs.

The Default model is trained to perform well on virtually all kinds of prompts. For those who wish to elevate their creativity by experimenting with different models, we’ve provided many others — each with different specialties. We’ll outline here what those specialities are with some examples to illustrate their differences.

An example prompt shown as rendered by both Default and Advanced models.

Image 2.0 – Default

Gencraft’s Default model is our bread and butter. Give it any length of prompt and it will give you a stunning result. Most images that come out of this model will be realistic (like a photograph) as opposed to more artistic representations. That’s where our Advanced model comes in.

Image 2.0 – Advanced

We added the Advanced model as an option intended for more experienced users — unlike the Default model, the more descriptive the prompt, the better the result. There is also more variance in the results of the Advanced model, whereas the Default model produces similar results if the same prompt is used repeatedly. This model can do everything from realistic images to abstract art.

When to Use Default vs Advanced Models

In short, our Default model performs well with all lengths of prompts, whereas our Advanced model performs better with long, detailed prompts. The Default model also usually creates photo-like images, so if you want something more artistic like anime, oil painting, or ink you may be better off with our Advanced model.Use the default model if :

Use the default Model if :-

  • You’re using a short prompt.
  • You want to create a photo like image.

Use Advanced Model if :-

  • You want more variance in your results.
  • You’re using a long prompt.
  • You want your result to anime, painting or another art style.

To illustrate the difference between models, let’s take a look at the result of each model when using a very short prompt, like the word “cat.”

The prompt “cat” from both models

On the left we have the result from the Default model, which is a pretty generic image of a cat. The Advanced model, however, generated something very different — more artistic, and a little more abstract.

When you enter longer prompts, the results from the two models are a lot more similar. See below, where we used the prompt “Wide angle shot of a chess board, vivid neon colors, surrealism, Alice in Wonderland.”

The prompt “Wide angle shot of a chess board, vivid neon colors, surrealism, Alice in Wonderland” from both models

Hyper-Realism

If you want hyper-realistic images, you can also choose our Hyper-Realism model. Unlike our Image 2.0 models, this model is trained specifically to create only images that resemble high-resolution photographs. This model will always be free to use for all users, regardless of subscription status.

Four different examples from Hyper-Realism.

Other Models: Cute Animals, Coloring Book, and More

We also offer a variety of other models to Pro users that are specifically trained for particular image styles. These currently include: Amazing Details, Cute Animals, Insta 2.0, Insta Natural, Insta Realistic, Long Exposure, Holiday Sweaters, Clay Art, 2D Art, Realistic Details, Logos, Textify, Enchanting Glow, 3D Character, Fire and Ice, Roses, Paint Splash, Stickers, ColorBook, and Paper Art.

If you’d like to utilize some of these specialized models but you’re not a Pro user, don’t worry! We make a few of them available to users on the Free Plan, rotating which ones are free every few weeks. So if the one you have your eye on isn’t currently available, please check back later — you might be in luck!

We are planning to release dozens more models like these in the near future. If you’d like to request a certain style, please let us know at support@gencraft.com or let us know on Discord.

Final Thoughts

Gencraft offers many different models to choose from when generating an image. Each of these models has certain specialities to keep in mind as you explore the creative possibilities they allow.

If you don’t see a model that quite fits the style you’re envisioning, see our guide to making your own custom model — in just a few easy steps you can build something that is exactly tailored to your own creative vision.

We hope this helped you to get started exploring Gencraft and its endless creative possibilities. Check out our other step-by-step guides, and feel free to contact us at support@gencraft.com if you have any questions we didn’t answer.

Back to all Blogs

Create AI Selfies | Photobooth Tutorial

Upload a photo of yourself and explore new identities with AI! Try Photobooth to swap your face in new images.

Gencraft
2 minutes read

Features

Photobooth allows you to generate variations of yourself! You can use Gencraft to become whatever you want – the only limit is your imagination. In this tutorial, we’ll walk you through how to use this tool and show some examples of what you can create with it.

Generate yourself in a different setting

To begin, type in your prompt. This prompt should envision the final image you wish to be a part of. In this example, we’ll be using “A fairy in the forest surrounded by small woodland creatures and mushrooms.”

Note: Make sure to mention a person in the prompt — if you just say “the forest,” the model won’t put you in the image.

Click on Image Selection Section on the left of the Prompt Input to either upload your photo or select an image from your past uploads. We’ll be using the image below as our reference:

The portrait we are uploading as our Photobooth reference image

Once you have chosen your image just go ahead and click on the Generate button.

It’s that easy! Our final image is shown below, with the image we uploaded incorporated into the prompt.

The uploaded image and the final image side by side.

Generate yourself in a different style

You can also transform images of yourself in exciting ways using Gencraft’s built-in Styles. You don’t need any sort of complicated prompt — simply enter a short sentence that includes a person, pick a style, and hit Generate! In the below example, we used the prompt “A woman wearing a headscarf” and selected “Cyberpunk” as our Style.

The uploaded image and the final image side by side.

Here is an another example using the Medieval Style. Notice again how general the prompt is here – our preset styles will do the rest.

The uploaded image and the final image side by side.

Of course, feel free to play around with Gencraft’s Advanced Settings such as model selection and negative prompts before you hit “Generate”.

We hope this tutorial was helpful. Check out our other step-by-step guides, and feel free to contact us at support@gencraft.com if you have any additional questions.

Join our Discord to share your art and meet other creators. https://discord.com/invite/gencraft

Back to all Blogs

Exclude objects from Result | Negative Prompts

Gencraft
2 minutes read

Other

Use the “Add Negative Prompt” section to specify exactly what you don’t want in your generations. These negative prompts exclude unwanted elements.

For example, say that you’re using the prompt “Modern architecture house.” The houses you’re generating look pretty good, but a lot of them have pools and you don’t want that to be a part of your image.

The prompt “Modern architecture house” without any negative prompts (left) and with “pool” added as a negative prompt (right).

If you click on “+ Add Negative Prompt” button, you can enter “pool” to encourage the model away from including a pool in your creations. With this configured, this prompt no longer results in houses with pools.

People often use this section to try and counter a lot of the common weaknesses of an AI art generator, such as abnormal hands or duplicated faces. Under the negative prompt text box, there are several suggested negative prompts to help you come up with ones that you may want to use.

Certain negative prompts are more effective than others, simply due to the fact that AI models do not always interpret language the way that people do. For example, you may try to make sure that a generated cat does not look like a dog by including “dog” as a negative prompt. Dog and cat, however, are two very closely related concepts. They are both animals, and they are both popular pets. To a person, the difference between the two is pretty distinct, sometimes to the point of framing them as opposites. But to an AI model? They are almost the same. This can result in a negative prompt being less effective. Just like many aspects of AI art generation, it may take some experimentation to get it right.

We hope this helped you to get started exploring Gencraft and its endless creative possibilities. Check out our other step-by-step guides, and feel free to contact us at support@gencraft.com if you have any questions we didn’t answer.

Back to all Blogs

🎯 Mastering Custom Seeds in Your AI Image Generation

Gencraft
3 minutes read

Other

Take your image creation to the next level by learning how to effectively use Custom Seeds! Using seeds gives you more control over the structure and composition of your generated images, making it easy to experiment with slight variations while keeping key elements intact. This guide will teach you what seeds are, how to use them, and how they can unlock new creative possibilities for your prompts.


What Is a Seed? 🌱

Think of a seed as the starting point or blueprint that guides the AI during image generation. Each time you generate an image, the AI randomly selects a seed behind the scenes. By choosing and reusing custom seeds, you can reproduce the same base composition and structure, allowing for precise edits without starting from scratch.

For example, if you loved the composition of one generated landscape but wanted to change the color of the sky, using the same seed with a slightly different prompt will recreate a similar image with just those specific changes.


Why Use Custom Seeds? 🎨

Using custom seeds offers a range of creative benefits:

  1. Maintain Structure:
    Control the layout of the elements in your image across multiple generations.
  2. Fine-Tune Variations:
    Generate slight variations of the same image by changing only part of your original prompt while keeping the composition consistent.
  3. Experiment with Precision:
    Iterate on a design by generating multiple similar images, each with subtle changes, so you can pick the best version.
  4. Save Time:
    If you’ve already found an image layout you love, using its seed will save time by avoiding the need to search for the right composition again.

How to Use Custom Seeds in Gencraft 🛠️

Note: Custom Seeds are a PRO 👑 only benefit in Gencraft, so upgrade today to start trying this powerful feature!

Seeds Option available in Advanced Settings.
  1. Find the Seed of a Previous Generation
    • After generating an image, look for the seed number displayed under your image/on the Generate Form ( in Advanced Settings tab. )
    • Lock the Custom Seed option to fix your next generations to those seed values.
  2. Start Generating New Prompts With Your Custom Seed
    • While Re-Generating a new prompt, write a slightly modified version of your original prompt to introduce the changes you want.

Example :-

  1. First Prompt:
    “A vibrant forest scene with glowing mushrooms and a deer.”
  2. Second Prompt (with the Custom Seed fixed):
    “A vibrant forest scene with glowing mushrooms and a fox.”

By using the same seed, both images will have a similar layout and structure—but the second version will feature a fox instead of a deer.


Handling Two Seeds for Paired Generations ✌️

When generating multiple images in a single batch, Gencraft allows you to input two seeds to control each image independently. Occasionally, you might notice that the images are returned with the order of the seeds swapped.

Don’t worry! Even if the images appear in a different order, the seeds still correspond correctly to the generated results. The key is that the structure and composition dictated by the seeds remain intact, no matter what order they appear in. Just pay attention to which seed corresponds to which final image.


Tips and Tricks for Using Seeds Effectively 🚀

Make Incremental Changes:
Modify only small parts of your prompt to explore creative variations while preserving your original composition.

Document Your Favorite Seeds:
Save the images with seeds that generated your best results. This way, you can revisit or tweak those images in your Collections later.

Use Seeds for Consistent Branding:
If you’re working on a series of visuals with a similar look and feel (e.g., product photos or social media content), reusing the same seed will ensure a cohesive aesthetic.

Avoid Overfitting to One Seed:
Don’t be afraid to try different seeds as well! While using custom seeds offers control, toggling the setting off and using random seeds can unlock exciting surprises.


Start Creating with Custom Seeds Today! 🎉

Now that you understand how custom seeds can unlock new creative potential, it’s time to try it yourself! Whether you’re refining a single prompt or building a series of cohesive images, using seeds gives you the precision and flexibility to perfect your results.

Head over to gencraft.com/generate and start experimenting with your own custom seeds today. We can’t wait to see what you create!

Back to all Blogs

How to write a perfect Prompt for Gencraft

Creating amazing AI images starts with a good prompt. If you’re new to this, don’t worry! This guide will teach you all the essentials — no prior experience required. Think of it like giving clear instructions to a robot: the better you describe your vision, the closer the result will be to what you imagined

Gencraft
3 minutes read

Other

Creating amazing AI images starts with a good prompt. If you’re new to this, don’t worry! This guide will teach you all the essentials — no prior experience required.

Think of it like giving clear instructions to a robot: the better you describe your vision, the closer the result will be to what you imagined.

Why Do Prompts Matter?

The prompt you write tells the AI exactly what to generate. But since the AI doesn’t “think” like a person, the more precise, descriptive, and focused your prompt is, the better your result will be. Experimentation is part of the fun, and even mistakes can lead to happy surprises!

Let’s break it down into simple tips to help you get started.

Tip 1: Start with a Clear and Specific Prompt 🧠

Vague prompts can confuse the model, leading to results that may not match what you’re imagining. Instead of:

  • “A beautiful landscape”

Try:

  • “A serene sunset beach scene with palm trees and gentle waves.”

The second prompt paints a clear picture for the AI, leading to more precise results. Think about the elements you want to include, such as objects, colors, and settings.

Tip 2: Use Descriptive Language for Mood and Style 📝

Add adjectives and adverbs to shape the mood, tone, or visual style you want to achieve. For example:

  • “A whimsical, colorful forest with glowing mushrooms and fairy lights.”
  • “A minimalistic black-and-white portrait of a cat with a mysterious expression.”

Descriptive language helps the AI understand the feeling and vibe you’re going for. The more vivid your descriptions, the closer the AI will get to your creative vision.

The second prompt paints a clear picture for the AI, leading to more precise results. Think about the elements you want to include, such as objects, colors, and settings.

Tip 3: Reference a Character or Artist for Inspiration 👩‍🎨

You can give the AI a reference to a well-known art style, movement, or artist. For example:

  • “A futuristic cityscape inspired by the neon aesthetic of Cyberpunk 2077.”
  • “A swirling, dreamy night sky in the style of Van Gogh’s Starry Night.”

This helps the AI match your vision with an existing aesthetic, guiding it toward the style you want.

Tip 4: Avoid Negations in Prompts ⛔️

The AI can struggle with words like “not” or “without.” Instead of saying:

  • “A huge mansion, no pool”

Try focusing on what you want to see instead. Use our negative prompt feature to explicitly exclude things:

  • “Generate a modern mansion surrounded by a garden”
  • Negative Prompt: “pool

Note: Negative prompts have varying degrees of effectiveness, depending on the Model you have selected. Some Models react very strongly to negative prompts, while others do not, so play around with it and adjust your prompt accordingly.

Tip 5: Experiment With Your Prompt Format 🔬

You can write your prompt as either a sentence or a list—whichever feels more natural to you:

  • Sentence: “A cat sitting on the beach enjoying the sunshine.”
  • List: “Cat, beach, bright sunshine, joyful expression.”

Both formats work, so feel free to experiment and see which one gets you the best results!

Tip 6: Use ((Word Weighting)) for Greater Emphasis 💪

If some parts of your prompt are more important than others, you can assign weights to them by using parentheses. The more parentheses you use, the more emphasis the AI places on those words.

Example Prompt with Weights:

  • “A (((tattoo of a fox))) on an ((ankle)) with a (weird, mystical aura).”

In this prompt:

  • “Tattoo of a fox” is the most important part (3 parentheses).
  • “Ankle” is second in importance (2 parentheses).
  • “Weird, mystical aura” has the least added emphasis (1 parenthesis).

Weights give you more control over what details the AI prioritizes in your final image.

Tip 7: Use the Prompt Enhancer for Extra Detail 🔎

Stuck on what to say? Try our Enhance Prompt tool! This feature adds more descriptive language and applies word weights to your prompt automatically.

Click the “Enhance Prompt” button at the bottom right of the prompt box to get started.

Example:

  • Starting Prompt: “A man standing in front of a castle.”
  • Enhanced Prompt: “A (((man))) standing confidently in a (((plaza outside a medieval castle))), his posture suggesting authority and gravitas, with the (opulent castle walls and turrets looming in the background).”